Online Help |
|
Online Help |
|
After choosing your colors for you store (see the guide Change Color and Fonts), you are now ready to add images.
Miva Merchant provides an Administration Interface that lets you add and change images for various items of your store, these include:
Category Tree categories
Category Titles
Navigation Bar
Background
Products (thumbnails and full-size)
Buttons
Your Company Logo (in the navigation bar)
If you want to add more images which are not part of the default Miva Merchant Administration User Interface, see the guide Add Graphics to Your Store Using HTML.
By default, Miva Merchant enters the navigation bar images for each of the store links in the colors associated with the Look & Feel Configuration Wizard: steel, hotdog, and olive.
In the Miva Merchant Administration Interface you can change these images to ones you've created, or had a graphic designer create for you. Think of ways to coordinate your store's look: creating Navigation images from one (or more) of your store products, for example. Using a certain font type that goes along with your products is another. Check the Galleria on the Miva Merchant web site at http://www.mivamerchant.com/galleria/ for additional ideas.
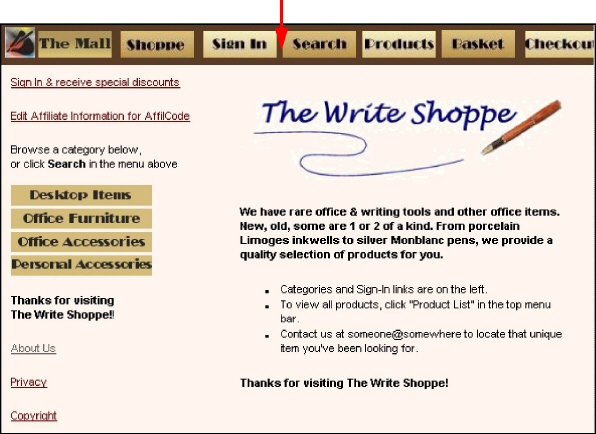
“The Mall” button in the sample below denotes there are other stores in this domain. The default is “Select Store.” (Whatever you label it, it allows your customers to locate other stores in the same domain, if you have them.) If you only have one store, this button is not displayed.
Navigation Bar
After you've created the buttons you want to use for the navigation bar, make sure you note where you have stored them.
After you have settled on a design for your store, you'll probably never visit this link in your Administration Interface again. (Except when you want to create a second store!)
Use the following procedure to change the navigation bar images.
Click the link for your store's name on the Administration Interface menu.
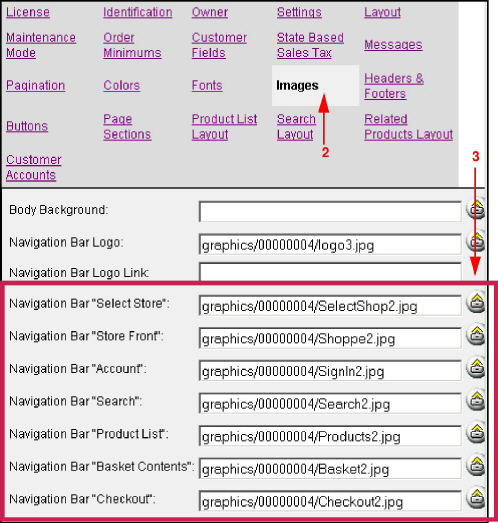
Click the Images link on the Edit Store form.
Next to the item you want to change, click the Upload File symbol.
In the Upload File box, click Browse and navigate to the folder in which you stored the image. Click Open.
Click Upload. (Or, paste or type the relative path to the Merchant2 graphics store # directory for stored image, then click Upload.)
Click Update button at the bottom of the Edit Store form.
We added The Write Shoppe logo (in the very left corner of the navigation bar.) In addition to adding your own company logo, the Administration Interface allows you to add a link to your logo. This link may connect to the index page of your company's web site, or perhaps a description page of your company/store. If your store front is the main page seen (you do not have an introductory page to your store), you might add a logo and link to an associated web site, such as the official site of the items your store is associated with.
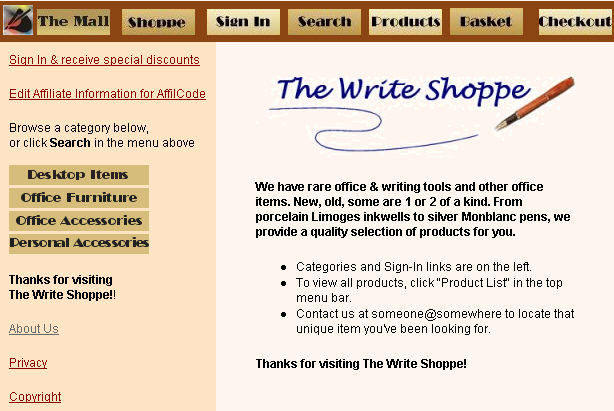
Your logo is part of your company identity and you can place it on your store's front page.
Use the following procedure to change the navigation bar logo
Click the link for your store's name on the Administration Interface menu.
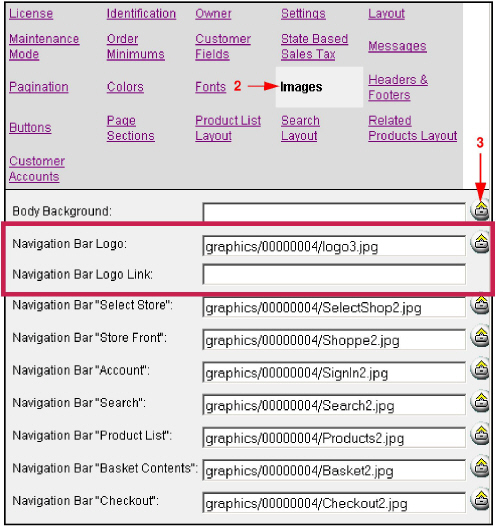
Click the Images link on the Edit Store form.
Next to the item you want to change, click the Upload File symbol. The Upload File box opens.
In the Upload File box, click Browse and navigate to the folder in which you stored the image. Click Open.
Click Upload. (Or, you can paste or type the relative path to the Merchant2 graphics store # directory in which you stored the image, then click Upload.)
Click Update button at the bottom of the Edit Store form.
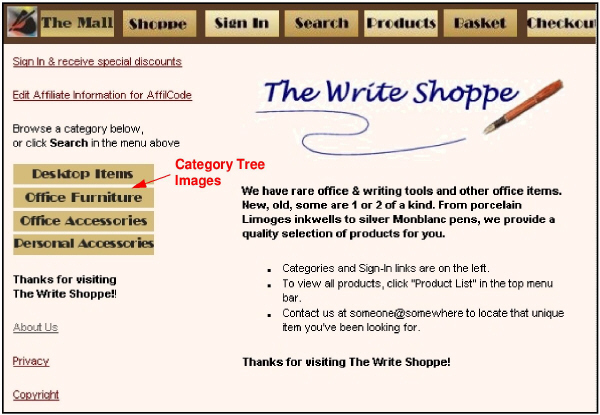
The category tree images replace the text (the names of the categories) in your category list.
As you see in the image of our store below, the category tree images are similar from the ones in the navigation bar. The major difference between the images in the navigation bar and the category, is the size. The ones in the category list are not as deep as the ones in the navigation bar. (The category images below are 140 x 20 pixels.)
You might want to experiment to see how the images will look in the category tree. You can make one image (use the longest category name), then use the same image for all your top-level categories – just to see how it looks. Then, if you like it, you can create the other category name images.
You may want to add a category tree image for each category in your store.
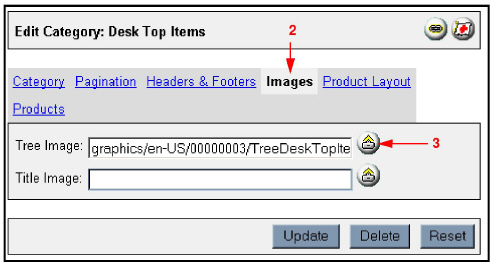
Use the following procedure to change the Category Tree Image.
Click the link for the category name in the Administration Interface menu.
Click the Images link on the Edit Category form.
Click the Upload File symbol.
The Upload File box opens.
Click Browse and navigate to the folder in which you stored the image.
Click Open.
Click Upload. (Or, you can paste or type the relative path to the Merchant 2 graphics store # directory in which you stored the image, then click Upload.)
Click the Update button at the bottom of the Edit Store form.
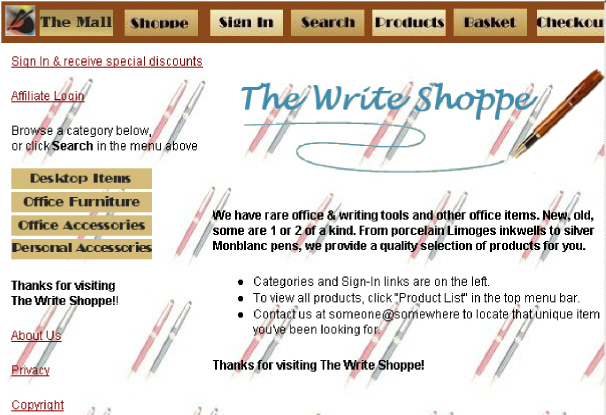
Currently, we have only selected a background color for the store. Now we will add an image as the background.
One of the good points about this background image (see the image below) is that it uses products that this store is selling, a pen set (staying with the theme).
One of the bad points about the background is that it makes the text in some places difficult to read. Another bad point is that the background is too distracting. (Where do your eyes focus when you look at the image below? Do they tend to wander from the background pens to the one in “The Write Shoppe” image, then perhaps the Category Tree links?) You probably want your customers to focus on the categories at this point, not the background.
Take a look at the background below, and compare it to the previous, similar background. It's not as distracting now and the text over the pens in the background is readable. (The pens are larger, there's less contrast, and more brightness in this background image, compared to the previous one.)
How busy the background pattern is, and ensuring readable text above the background, are just two of the considerations that must be taken into account when adding a background to your store.

Keep in mind, the actual size of the image you use for the background image can be quite small, since the image tiles in the browser window.
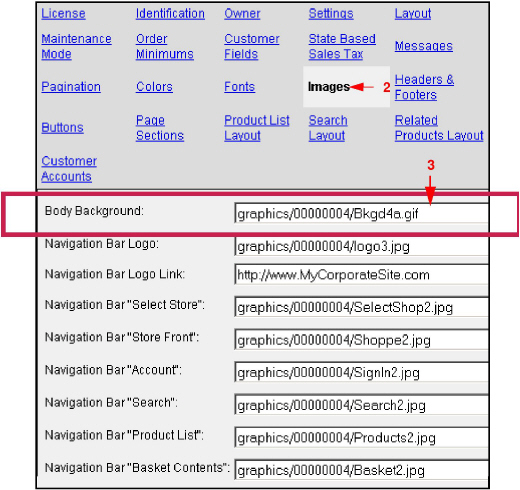
Use the following procedure to change your Background Image.
Click the link for your store's name on the Administration Interface menu.
Click the Images link on the Edit Store form.
Next to the item you want to change, click the Upload File symbol.
The Upload File box opens.
Click Browse and navigate to the folder in which you stored the image.
Click Open.
Click Upload. (Or, you can paste or type the relative path to the Merchant2 graphics store # directory in which you stored the image, then click Upload.)
Click the Update button at the bottom of the Edit Store form.
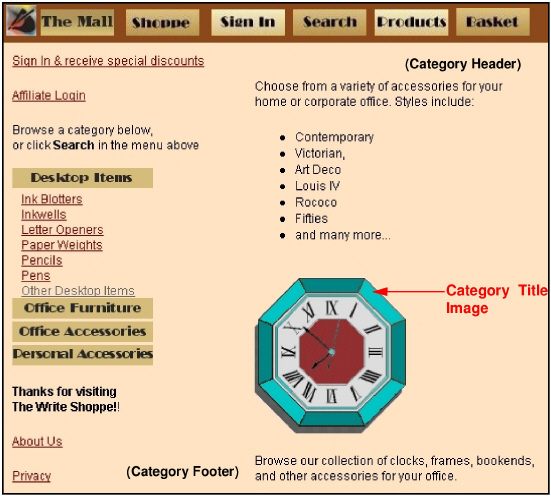
What could you put in a top-level (parent) category that only contains other categories and no products? When a category does not have products, that category page will be nearly empty. In the store example below, both the header and footer contain text, describing the products in this category.
As is mentioned in Add Text to Your Store, there is an option that directs Miva Merchant to display the name of the category as the Category Title. You also have the option of displaying an image in place of the category title text.
As you see in the image of our sample store below, one of the products in Office Accessories is used as the Category Title Image.
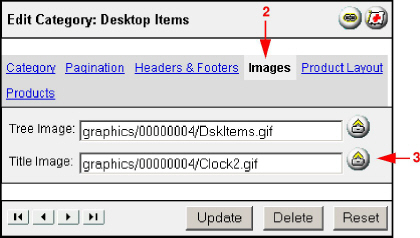
Use the following procedure to change a Category Title Image
Click the link for the category name in the Administration Interface menu.
Click the Images link on the Edit Category form.
Click the Upload File symbol.
The Upload File box opens.
Click Browse and navigate to the folder in which you stored the image.
Click Open.
Click Upload. (Or, you can paste or type the relative path to the Merchant2 graphics store # directory in which you stored the image, then click Upload.)
Click the Update button at the bottom of the Edit Store form.
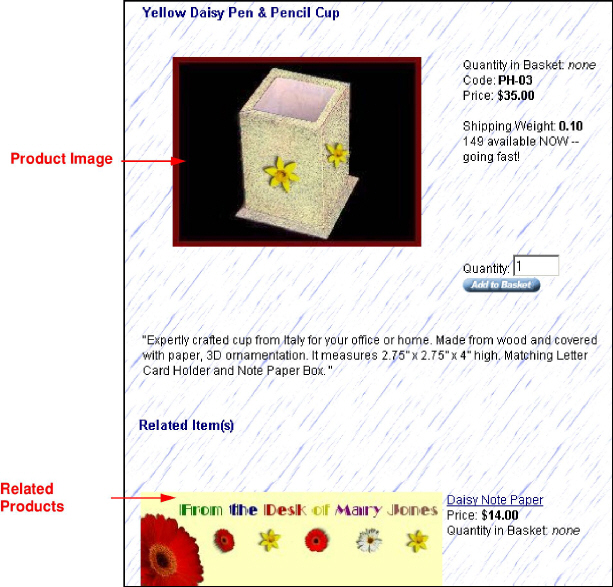
Miva Merchants provides the interface to add a full-sized image of your product (by default, it displays on the product description page of your store). You may also add product thumbnail images which are displayed to your customer at the category level, for example.
Notice the frame around the product image in the sample store image below. When you have a background with an image, which may not be easy or quick for you to duplicate in the background of your product image, you can simply enclose the product in a border or frame and use a contrasting interior color.
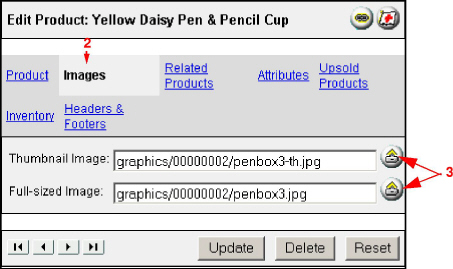
Use the following procedure to change Product Images
Click Products in the Administration Interface menu, and locate the product you want to change.
Click the Images link on the Edit Product form.
Click the Upload File symbol. The Upload File box opens.
Click Browse and navigate to the folder in which you stored the image.
Click Open.
Click Upload. (Or, you can paste or type the relative path to the Merchant2 graphics store # directory in which you stored the image, then click Upload.)
Click the Update button at the bottom of the Edit Store form.
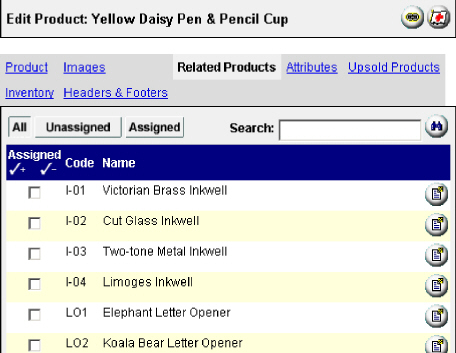
When you have coordinating or complementary products, you can list these on the product display page.
Just as with the other List layouts, such as the Product List Layout, you are able to choose the layout (line item or full)
To add Related Products:
Click Products in the Administration Interface menu, and locate the product you want to change.
Click the Related Products link on the Edit Product form.
Check the boxes for the items you want related.
Click Update.
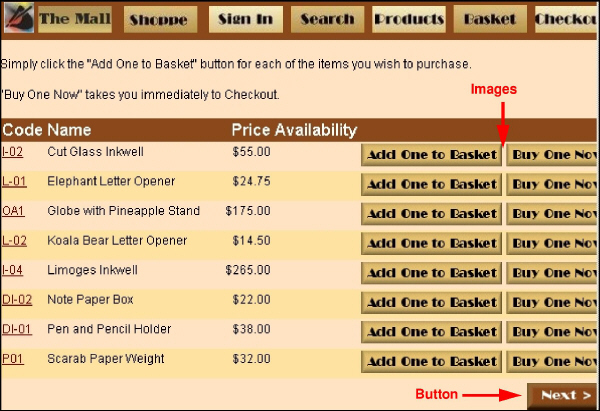
Your Miva Merchant store contains many buttons and images to assist the user in shopping and in navigating around your store. Some of these are Form buttons, such as Login, Continue, Next and Previous. Others are images, which are supplied with Miva Merchant, such as Add One to Basket and Buy One Now.
You can create your own images to replace any or all of the gray Form buttons in addition to the default Miva Merchant images.
Or, you might simply want to change the text of an existing Form button.
You many want to change the Add One to Basket and the Buy One Now images to match the design of your site, as shown in the Product List example below.
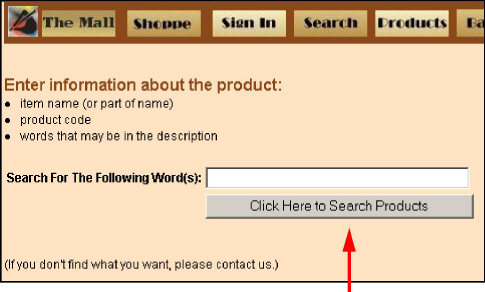
Altering the text that displays on the gray Form buttons is another option you have. Here, the Search form button text was changed.
Notice that the size of the field entry box also changes along with the size of the form button, making both more prominent on the page.
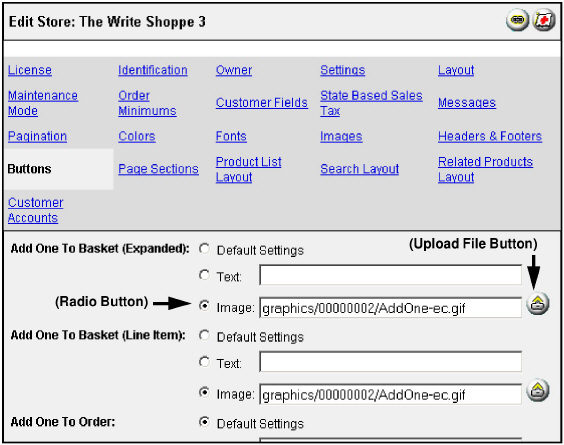
Use the following procedure to change the Buttons and Images.
Click the link for your store's name on the Administration Interface menu.
Click the Buttons link on the Edit Store form.
If you want to use an image you've created, perform the following steps.
Next to the item you want to change, click its Radio button.
Click the associated Upload File symbol. (The Upload File box opens.)
Click Browse and navigate to the folder in which you stored the image.
Click Open.
Click Upload. (Or, you can paste or type the relative path to the Merchant2 graphics store # directory in which you stored the image, then click Upload.)
To enter Alternate image text, enter it into the Text box, but do not click its Radio button.
Click the Update button at the bottom of the Edit Store form.
If you want to change the text for a Form button, click the Text Radio button, add the text, and click Update at the bottom of the Edit Store form.