Online Help |
|
Online Help |
|
After you have added or modified the default text, you may still want to add additional text, table, and links. These can be added into the messages, headers and footers, and other text boxes that also accept HTML.
When this store was first created, in the Look & Feel Configuration Wizard, we added as image and text to the Welcome Message. After adding products and categories to a store, you can also use the Look & Feel Configuration Wizard to add products or categories to your store front in table columns. But, here we are focusing on the text. For information on adding graphics, see the customizing guide “Change and Add Images” and the Miva Merchant User Guide “Change the Look & Feel of Your Store, Using the Look & Feel Configuration Wizard.”
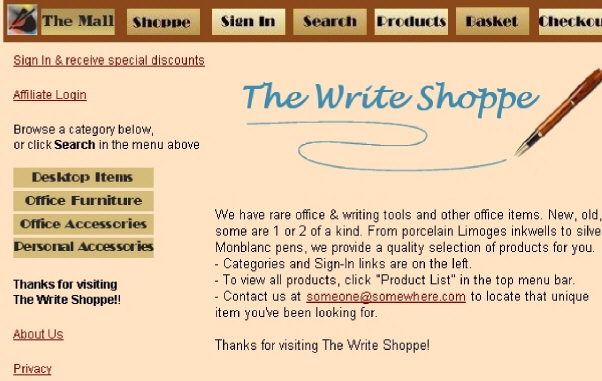
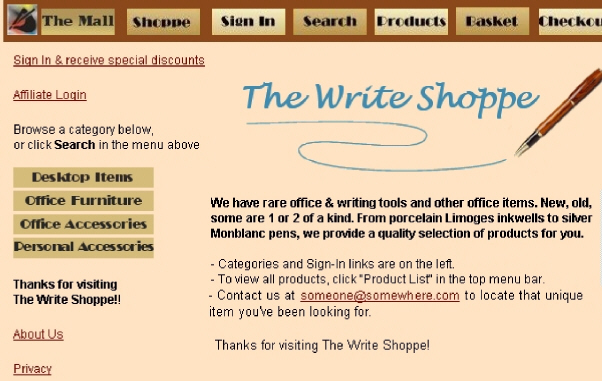
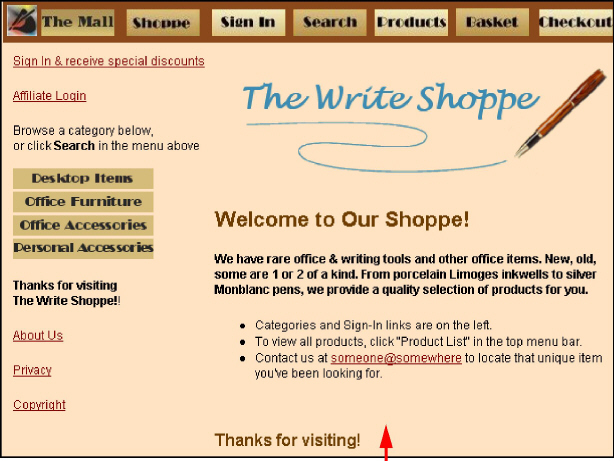
This initial Welcome Message includes only an image and text. This text has only a limited amount of HTML – only a few line breaks <BR> and the mail tag. But, nothing in the text really stands out. Let's add some HTML to change the font weight and size, add some bullets, and perhaps change the color.
The first paragraph now stands out with the bold text, (the <B> tag). Compare it to the previous page.
Italics and underline text should be minimized. Italics is a bit difficult to read online. Underline text has traditionally been used to identify a link. Instead use colors, bold, and/or increase the font size. You could also use the format to call attention to items, such as a bulleted list.
Here, for the titles we used the in-line tag <H2> for the first heading (Welcome to our Shop). The last line (Thanks for visiting) uses the font size +1.
The font size tag uses a relative size range between -3 to +3. This is mapped to an absolute font size by adding the current base font size as set by the BASEFONT element, or set by the user's Browser. Heading 1 <H1> is equivalent to +3, Heading 2, <H2> equivalent to +2, and so on.
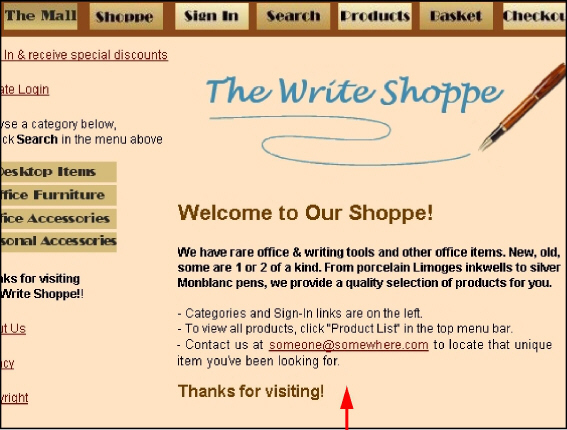
Non-serif fonts (those without the little tails) seem easier to read online. Therefore, we've changed the font face of the Welcome message, using the in-line HTML tag <Font Face=”Arial, Helvetica, sans-serif”>. We used three font names to be sure to include fonts of all platforms.
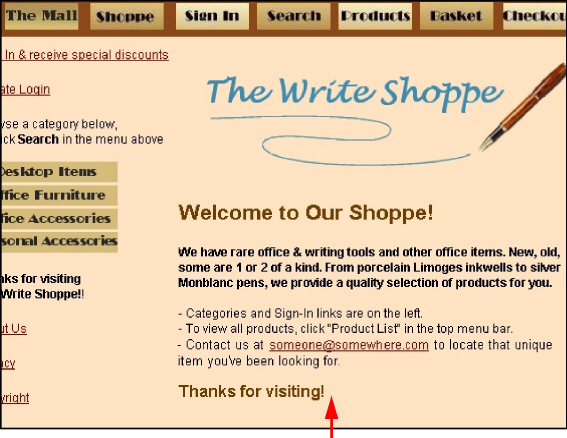
The bulleted list provide directions for the shoppers. Notice the Email is also included here. The HTML is the standard unnumbered list.
Miva Merchant allows you to enter the HTML code in text boxes to format your data.
We've formatted this text using alignment, font attributes and properties, and paragraph elements.
The image was added earlier by the Look & Feel Configuration Wizard. Adding graphics with HTML is discussed in a separate guide.
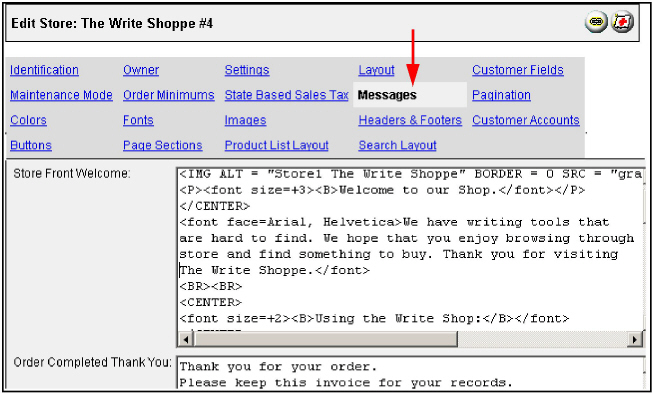
To modify text:
In the Administrative Interface, click your store name, then click the Messages link.
Enter the text (paste or type) into the Store Front Welcome text box.
Identify the phrases you want in larger text size. (You can use the <font size=+2> or the <H2>, for example.
Identify those you want centered <center>.
Click Update.
Complete HTML Text
</blockquote>
<IMG ALT = "Write Shoppe" SRC = "graphics/00000004/ TitlePen_Trans.gif">
<P>
<H2><Font color = "#6E3900">
<B>Welcome to Our Shoppe!</B></font></H2></P>
<Font face = "arial, helvetica, non-serif" size = -1> <B>We have rare office & writing tools and other office items. New, old, some are 1 or 2 of a kind. From porcelain Limoges inkwells to silver Montblanc pens, we provide a quality selection of products for you.</B><BR><BR>
<UL>
<LI>Categories and Sign-In links are on the left.
<LI> To view all products, click "Product List" in the top menu bar.
<LI>Contact us at <a
href="mailto:someone@somewhere.com">someone@somewhere</a>
to locate that unique item you've been looking for.<BR><BR> </UL><BR><BR>
</Font>
<Font face = "arial, helvetica, non-serif" size = "+1"
color = "#6E3900">
<B>Thanks for visiting!</B></font>
<!-- #5A3921 nav bar bkgrnd -->
<blockquote>
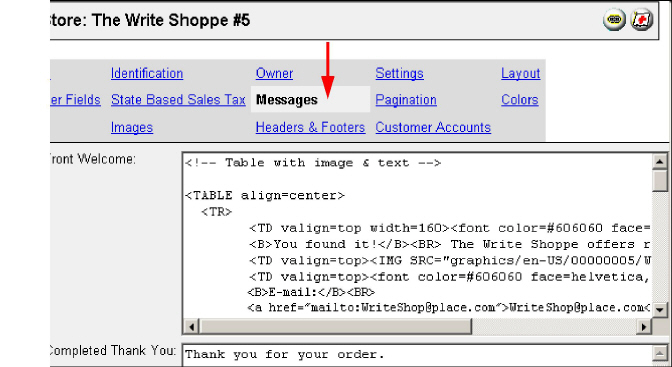
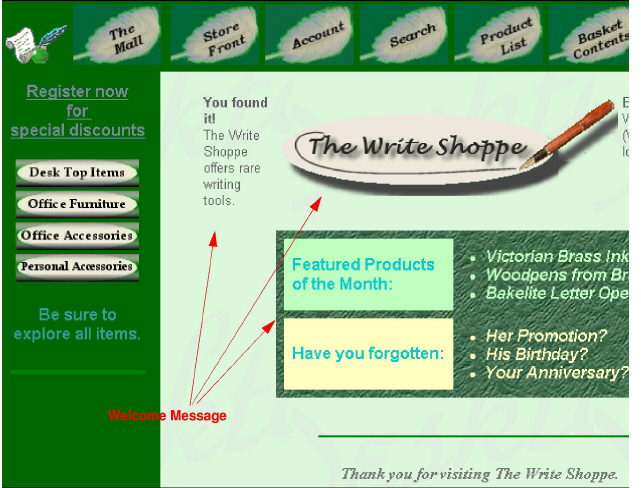
The store image below contains two tables in the Welcome Message. The first contains only three cells: text in the first, an image (new Write Shoppe logo) in the second, and text in the third cell. No background color is used in this table. Using tables helps align your data.
The second table in our store uses an image for the background. Here, we've used a leather look, which provides some texture to the page. We used different colors for two of the table cells. Using the HTML table tag <TD bgcolor="#FFFFC0">. Why? It helps to highlight each of the ideas.
Also notice the use of font colors <font color="#C0FFC0">, for example. We've also defined the size, and face.

It's often a good idea to create an HTML file you can view in a browser or two, before copying the HTML (minus the body/head tags) into the Store Front Welcome Message text box.
To insert a table
Create a separate HTML text file. Edit it until it looks the way you want.
In the Administrative Interface, click your store name, then click the Messages
link.
Copy all but the HTML, HEAD, and BODY tags from your separate HTML file and paste it into the Store Front Welcome message text box.
Click Update.
Complete HTML Text for Entering A Table in Welcome Message
<!-- Table with image & text -->
<TABLE align=center>
<TR>
<TD valign=top width=160><font color = ”#606060” face = “helvetica, arial, sans-serif”>
<B>You found it!</B><BR> The Write Shoppe offers rare writing tools.</font></TD>
<TD valign=top><IMG SRC="graphics/en-US/00000005/
WriteShoppe5.gif"> </TD>
<TD valign=top><font color = “#606060” face = “helvetica, arial, sans-serif”>
<B>E-mail:</B><BR>
<a href=”mailto:WriteShop@place.com”>WriteShop@place.com</a> (We'll find what you're looking for.) </font></TD>
</TR>
</TABLE>
<P>
<!--Table with background image & colors, & bulleted text--> <TABLE align=center cellpadding="8" cellspacing="8" background="graphics/en-US/00000005/leather-greenish.jpg">
<TR>
<TD bgcolor="#C0FFC0"><font color="#00CCCC" size= “+1” face = “helvetica, arial, sans-serif”>
<B>Featured Products<BR>
of the Month:</B></font>
</TD>
<TD><font color="#C0FFC0" size= “+1” face= “helvetica, arial, sans-serif”>
<LI><i><b>Victorian Brass Inkwells</b></i>
<LI><i><b>Woodpens from Brazil</b></i>
<LI><i><b>Bakelite Letter Openers</b></i></font>
</TD>
</TR>
<TR>
<TD bgcolor="#FFFFC0"><font color="#00CCCC" size= “+1” face= “helvetica, arial, sans-serif”>
<B>Have you forgotten:</B><BR>
</TD>
<TD><font color="#FFFFC0" size= “+1” face= “helvetica, arial, sans-serif”>
<LI><i><b>Her Promotion?</b></i>
<LI><i><b>His Birthday?</b></i>
<LI><i><b>Work Anniversary?</b></i></font>
</TD>
</TR>
</TABLE>
This top-level category does not contain products, only other categories, therefore its page is empty by default. In this case, we used the category's footer to include information about the origin of our products. It's in the footer so that the Category Title, Desk Top Items, displays above the table. (Category headers display above the Category Title.)
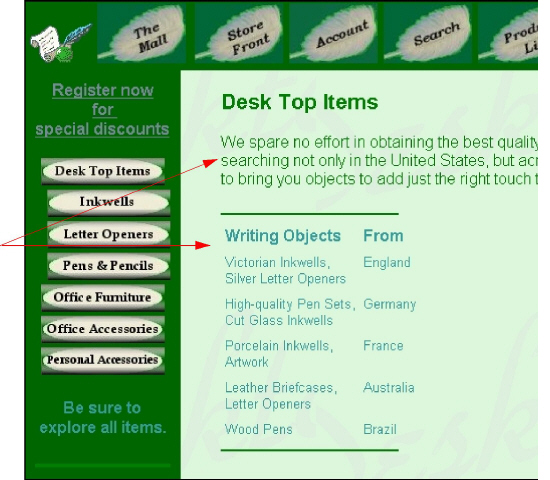
Similar to entering data into the Store Front Welcome message, you may want to try out the data in a separate HTML file, first. Paste it (without the <body> and <HTML> tags, into the Category Footer.

To insert the table:
In the Administration Interface menu, under the name of your store, click the name of the desired category. (Click the down arrows to expand the category, if needed.)
Click the Headers & Footers link.
Paste the HTML text (without the <body> and <HTML> tags, or type your table directly into the Category Footer.
Click Update.
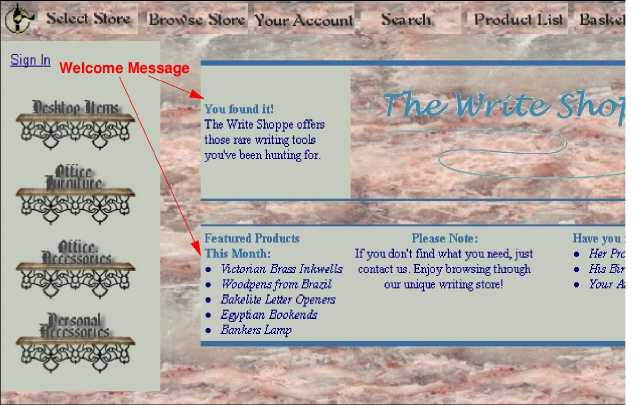
The following store image contains one table entered in the Store Front Welcome message. Notice that you can see the background image (the marble) behind the Write Shoppe image. This is because the Write Shoppe graphic is a gif format with a transparent background, and no background color was defined for the cell containing the image. The other cells of the table include a background color (TD bgcolor="#C6CCC0">, otherwise the text would not be readable on the marble background, which brings into question whether or not it is a good design decision to use such a background. (See the Web Design links in the Internet Resources guide.) Notice the choice of images for the categories. The wrought iron scroll works well with marble.
Create an HTML file you can view in a browser or two, before copying the HTML (minus the body and html tags) into the Store Front Welcome Message text box.

It's a good idea to see how it looks in a couple browsers, and if possible, in different operating systems. (Different browsers, and environments can affect how the pages look.)
After you paste the data into the text box, it may not look exactly as it did when it stands on its own. This is due to the other elements that are part of your store.
To insert a table
Create a separate HTML text file.
In the Administrative Interface, click your store name.
Click the Messages link (as shown in the image here).
When the HTML file appears as you want, copy all but the HTML, HEAD, and BODY tags and paste it into the Store Front Welcome message text box.
Click the Update button at the bottom of the data page.
Complete HTML Text for One Table above Store Background Image HTML
<TABLE cellpadding=4 cellspacing=0 border=4 bordercolor="#366CA3" frame="hsides" rules="rows">
<TR>
<TD width=180 valign=middle bgcolor="#C6CCC0"><font color="#366CA3" size=-1><B>You found it!</B></font><BR><font size=-1> The Write Shoppe offers those rare writing tools you've been hunting for.</ font>
</TD>
<TD colspan=2><img width=400 height=120 src="graphics/en-US/ 00000008/Title-PenStore5-2.gif">
</TD>
</TR>
<!-- A row used as a separator -->
<TR>
<TD colspan=3><P> </P>
</TD>
</TR>
<TR>
<TD valign=top bgcolor="#C6CCC0">
<font color="#366CA3" size=-1><b>Featured Products<BR>This Month:</ b></font><BR>
<LI><font size=-1><i><b>Victorian Brass Inkwells</b></i></font> <LI><font size=-1><i><b>Woodpens from Brazil</b></i></font> <LI><font size=-1><i><b>Bakelite Letter Openers</b></i></font> <LI><font size=-1><i><b>Egyptian Bookends</b></i></font> <LI><font size=-1><i><b>Bankers Lamp</b></i></font>
</TD>
<TD width=180 align=center valign=top bgcolor="#C6CCC0">
<font color="#366CA3" size=-1><B>Please Note:</B></font><BR>
<font size=-1>If you don't find what you need, just contact us. Enjoy browsing through our unique writing store!</font>
</TD>
<TD valign=top bgcolor="#C6CCC0"><font color="#366CA3" size=-1><b>Have you forgotten:</b></font>
<LI><font size=-1><i><b>Her Promotion?</b></i></font> <LI><font size=-1><i><b>His Birthday?</b></i></font> <LI><font size=-1><i><b>Your Anniversary?</b></i></font>
</TD>
</TR>
</TABLE>
This table uses the same gray color as the table on the store front page and the Category Tree background, so as to not add more variety, with an already somewhat busy background image. Identifying the table background color makes the text readable. which it would not be above this marble background.
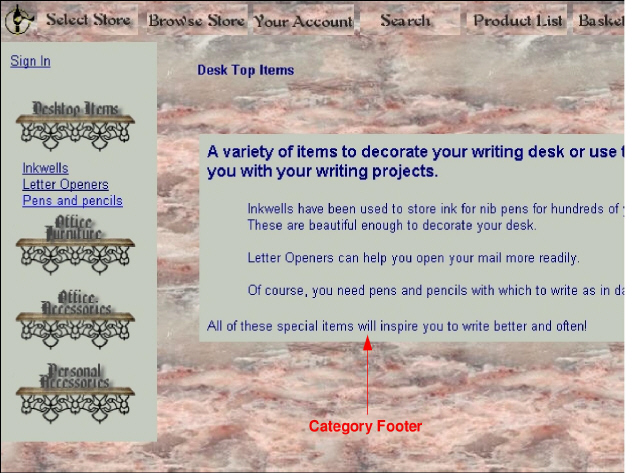
We entered the table in the Category footer so the Category Title, which is checked on, (see the side image) displays above the table.

To insert the table:
In the administrative interface menu, under the name of your store, click the name of the desired category. (Click the down arrows to expand the category, if needed.)
Paste the HTML text (without the <body> and <HTML> tags, or type your table directly into the Category Footer.
Click the Update button at the bottom of the page.
Complete HTML Text for a One-celled Table
<P> </P>
<Table cellpadding=8>
<TR>
<TD bgcolor=#C6CCC0>
<Font size=+1><B>A variety of items to decorate your writing desk or use them to help you with your writing projects.</B>
</Font>
<BR><BR>
<blockquote>
Inkwells have been used to store ink for nib pens for hundreds of years. These are beautiful enough to decorate your desk.
<BR><BR>
Letter Openers can help you open your mail more readily.
<BR><BR>
Of course, you need pens and pencils with which to write as in days gone by!
<BR><BR>
</blockquote>
All of these special items will inspire you to write better and often!
</TD>
</TR>
</Table>
HTML also provides a way for you to create bulleted lists, which, in this case, are included in our second table, as shown in the following store image.
(The link below will take you back several pages, showing a table entered into the Administration Interface messages.
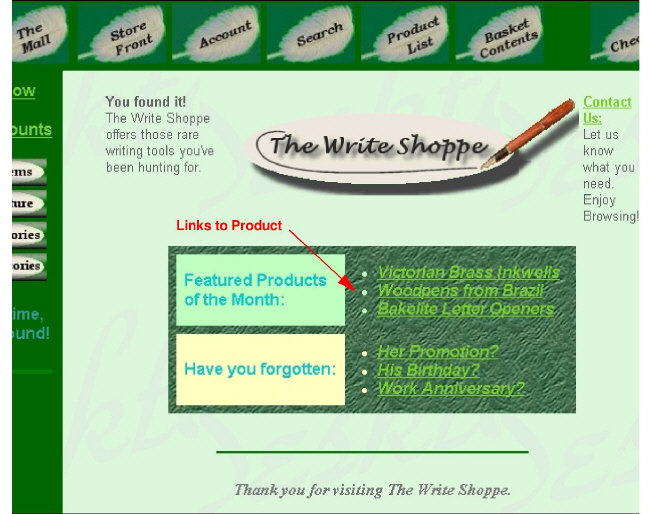
This store front looks very much like the previous one. However, we have added links. Notice the “Contact Us” is now a mailto link, and the “Featured Products of the Month “and “Have you Forgotten” items are linked to specific products.
The “Have You Forgotten” links could also go to hidden categories. (Products can be assigned to more than one category.) See the customizing guide “Change Store Layout” about hidden categories.
Again, you may want to create your table in a separate HTML file. However, you may not be able to test the store links (links to your store's products) until you paste it into the text box, or put it in your Merchant2 script directory.
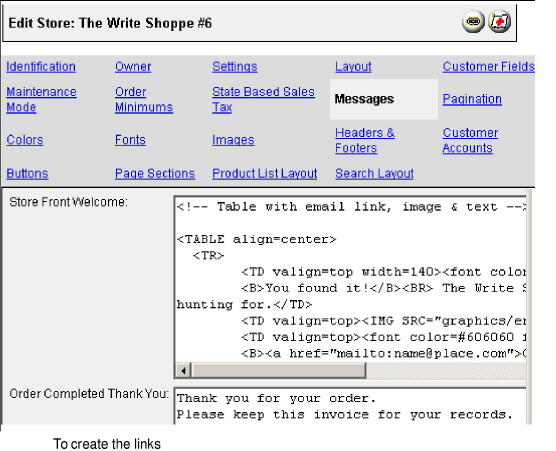
In the Administrative Interface menu, click your store name, then click the Messages link.
Enter the mailto: tag for your store, in the format <a href=”mailto:name@place.com”>Contact</a>.
Get the address for the product you want to link to:
In your Administration Interface, go to the product page to which you want to create a link. In the top, right corner, click the link button, then copy the Product Display URL.
|
|
Note: Usually a link in your store to an item in your store can be a relative link. (Starting with “merchant.mv?” as shown in the Complete HTML text on following page.) Relative links will not work for cgi style stores, and if the link is outside the store. |
Enter the product address you copied as the destination for the HTML <a href> tag.
Click Update.
Test your link.
Complete HTML Text for a Product List
<!-- Table with email link, image & text -->
<TABLE align=center>
<TR>
<TD valign=top width=140><font color=#606060 face=helvetica, arial> <B>You found it!</B><BR> The Write Shoppe offers those rare writing tools you've been hunting for.
</TD>
<TD valign=top><IMG SRC="graphics/en-US/00000005/
WriteShoppe5.gif"> </TD>
<TD valign=top><font color=#606060 face=helvetica, arial>
<B><a href="mailto:name@place.com">Contact Us:</a></B><BR>Let us know what you need. Enjoy Browsing!</TD>
</TR>
</TABLE>
<P>
<!--Table with background image & colors, & bulleted text-->
<TABLE align=center cellpadding="8" cellspacing="8" background="graphics/en-US/00000005/leather-greenish.jpg">
<TR>
<TD bgcolor=#C0FFC0><font color="#00CCCC" size=+1 face=helvetica, arial>
<B>Featured Products<BR> of the Month:</B></font>
</TD>
<TD><font color="#C0FFC0" size=+1 face=helvetica, arial>
<LI><a
href="merchant.mv?&Screen=PROD&Store_Code=6&Product_Code=VBI&Categ ory_Code=IW"><i><b>Victorian Brass Inkwells</b></i></a>
<LI><a
href="merchant.mv?&Screen=PROD&Store_Code=6&Product_Code=WP&Catego ry_Code=PAP"><i><b>Woodpens from Brazil</b></i></a>
<LI><a
href="merchant.mv?&Screen=PROD&Store_Code=6&Product_Code=ELO&Categ ory_Code=LO"><i><b>Bakelite Letter Openers</b></i></a></font>
</TD>
</TR>
<TR>
<TD bgcolor=#FFFFC0><font color="#00CCCC" size=+1 face=helvetica, arial>
<B>Have you forgotten:</B><BR>
</TD>
<TD><font color="#FFFFC0" size=+1 face=helvetica, arial>
<LI><a
href="merchant.mv?Screen=PROD&Store_Code=6&Product_Code=NPB1"><i>< b>Her Promotion?</a></b></i>
<LI><a
href="merchant.mv?Screen=PROD&Store_Code=6&Product_Code=Clk1"><i>< b>His Birthday?</a></b></i>
<LI><a
href="merchant.mv?Screen=PROD&Store_Code=6&Product_Code=MP&Categor y_Code=PAP"><i><b>Work Anniversary?</a></b></i></font>
</TD>
</TR>
</TABLE>
<BR><BR>
<CENTER>
<!-- Comment: Horizontal line -->
<HR SIZE=2 WIDTH=58% COLOR="green"><BR>
<P>
<!--Changing FONT=ITALICS-->
<FONT SIZE=+1 COLOR="777777" face=Times, Times New Roman, Serif> <I><B>Thank you for visiting The Write Shoppe.</B></I>
</FONT>
</CENTER>